Note: This post is for my Toptal application as a Product Manager. The skill I’m highlighting is Product Development Manager. I intend to turn this content into a short book.
INTRODUCTION
I’ve been building and shipping high quality software since 2010 for over 8 years now – mostly for myself, early stage Silicon Valley start-ups, and innovation groups within well established organizations. I’ve shipped dozens of products, pulled countless all nighters, and worked with hundreds of entrepreneurs, clients, and contractors.
Over the years I’ve developed a process to plan, build, and ship products on time and on budget.
It’s all about the process and that’s the entire focus of this book. Keep reading and I’ll tell you everything you need to know to turn your vision into reality.
Who Is This Book For?
This book was written with three readers in mind. First, early stage entrepreneurs who are often building products without the support of a large team or deep pockets. Often these entrepreneurs are funding their dream out of their own pockets and are building the first version of their product in order to raise funds from investors.
The second type of reader this book will benefit is innovators within established organizations. I’ve worked with several innovation groups within huge 100-year old companies. Organizations like Stanford University, ExxonMobil, and Corning Glass (creator of Pyrex™ and Gorilla Glass™) must continue to innovate in order to develop new products and reach new markets.
The third and final reader are product and project managers with fewer than 5 years of experience. For this group, I’m sharing the distilled version of what I’ve learned about how to ship software on-time and on-budget.
Finally, this book is focused on software but I’ve applied these principles to help companies with their firmware, hardware, and even consumer electronics. Take what applies to your situation and leave the rest behind.
How This Book Is Structured
This book is broken into four parts. The first part covers the importance of process and proper communication, the origin story of the process I discovered, and how most projects fail. Part two covers the three main phases of the process and includes a brief discussion of costs. Part three is a detailed step-by-step walkthrough of the entire process, including an example.
Finally, part four is a copy of the blueprints that I’ve used for years to help me adhere to the process. Feel free to download and print additional copies from my website, where you’ll find other valuable resources and a way to contact me directly.
One final note: Use this book however you see fit for your project. If you want to read through all of the written content first and then work through the blueprints, that’s fine. If you want to do a first pass on your project’s blueprints as you read along, that’s fine too. Make the process work for you and your project.
PART I: THE CONCEPT
Origin Story
I taught myself to code in 2010 when I started my first company. Soon after, I realized how important it was to track my time while I was coding. I would estimate how long a set of features would take and then track my actual time coding. When I first started doing this, it would take me 1,000% longer than my estimates.
I would spend a few minutes planning a feature and then I would get to work. But as soon as I started writing code I would hit an issue that I hadn’t foreseen while I was planning. I would spend hours coding in circles trying to fix the issue on the fly. I would write code, delete it, and write it again until I finally had something that was duct-taped together – which of course was so fragile that it would break the next time I was working on related features.
In an attempt to improve my estimates and reduce my frustration, I started spending more time planning features, breaking them down into smaller and smaller sub-features, visualizing the code I would later write, and really trying to anticipate where any difficulties would be.
I started sketching each screen of my applications and taking the extra time to make sure I understood how users would navigate from screen to screen. I went the extra mile during the planning phase to identify the underlying data model in an attempt to discover any potential issues.
By doing this extra work, I cut the average error of my estimates from 1,000% to only 50%. And while I was never able to perfectly estimate how much time it took to build features, I became much better and much more reliable.
I was starting to develop a process for building products.
So when I signed a contract with a client to design and actually build a demo mobile app in only 6 days, I was pretty confident that I could do it. Six days later, just before midnight, we submitted my client’s application – along with a completed demo – to the now famous start-up incubator Y-Combinator. We celebrated because we had done what most thought was impossible.
This became the model I would follow and refine for the next few years. Since then I’ve been the “shadow” chief technical officer (CTO) behind many start-ups and shipped dozens of applications and websites.
This short book concisely describes the reliable, repeatable process of on-time and on-budget product development. An inexpensive investment in detailed planning pays enormous dividends when it’s time to begin development – the most expensive portion of any project.
It’s All About Process
My “secret” to defining, designing, and launching products on tight timelines and tight budgets isn’t a secret at all – I’ve been talking about it for years.
Have a process and stick to it.
My process has allowed me to design and launch production-ready software in as fast as 6 days. My process has built a technologically ground-breaking iOS app that was quoted at over $200,000 by another firm for only $23,000 – nearly 25% under my initial estimate of $30,000. My process has helped developed valuable patents for my clients. My process puts you in control so that you know exactly where your money is being invested.
The Typical Story
Here’s the sad story of how most projects fail. You’ve probably heard it before from a colleague or entrepreneurial friend. It starts with a good idea, a little funding, and a lot of hustle. Next thing you know they’re talking to a big development firm or ramping up the in-house team who focuses only on bugs and maintenance. After a few minutes of describing the project, the development team is telling your friend how easy their project will be to build. They start quoting timelines and resource requirements that just sound too good to be true.
6 months later they haven’t shipped anything and are stuck at “98% done.” Your buddy is being held hostage. The only options are to find another team or to cancel the project altogether. But neither option gives your friend his time and money back or guarantees that the project will ever go live.
Not every project needs to be finished in 6 days, but dragging on for 6 or 9 months is ridiculous. I’ve never seen a properly scoped project that couldn’t be built in under 2 or 3 months and most of my projects take fewer than 5 weeks. Anything longer than that means that the project wasn’t scoped well or the firm is milking you for everything you’ve got.
Communication Is the Core of Good Process
We’ve all had that experience of struggling to make a takeout order over the phone and never being quite sure that your order was received correctly. Your best case is that you feel anxious but luck out and get exactly what you ordered. Your worst case is that nothing is right, you’re frustrated, and maybe still hungry.
When building, marketing, and launching something as complex as a new product, miscommunications waste time, money, and assure that you’ll never get what you ordered.
When it comes to building software, you don’t want adventure. You want clear communication, reliable timelines, and transparency. You want your vision executed on time and on budget so that you can get your project in user’s hands and start getting feedback about what they like and what they don’t.
PART II: An Overview
A Three Phase Process
In this section of the book we’re going to cover the process at a high level and discuss costs.
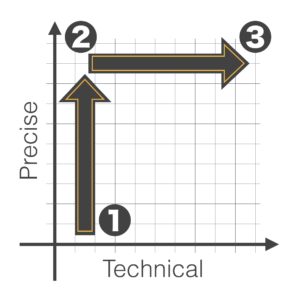
So what is the process? There are three straightforward phases:
- Get your ideas out of your head and on paper. Then brainstorm, research, and refine those ideas until you’re confident about what you want to build.
- Next, make the concept as precise as possible by identifying and eliminating any ambiguity or confusion.
- Finally, translate everything into the most technical language possible so that when you bring on a development team you know that everyone is on the same page.
You’ll have answered questions about your goals, target users, monetization and marketing plan, and evaluated the competitive landscape. You’ll also have detailed drawings of every aspect of your application and a technical specification that can be handed to the right development talent and built quickly. These outputs will be clear, precise, and technical – minimizing miscommunications.
It’s all pretty obvious. The big “secret” is to have a process and stick to it, which requires discipline. The key is to break everything down into simple steps so that nothing is overwhelming and you can confidently move your project forward.
I’ve used this exact process to successfully build and ship dozens of products over the last decade. The process keeps projects on-time, on-budget, and reduces the stress of bringing a new product into the world.
Let’s dig into each phase in more detail.
1) Get your ideas out of your head and written down
Most people who aren’t experienced software engineers (and even many who are) try to communicate complex ideas with spoken word only. This is a mistake for 3 reasons:
- There’s way too much room for error – assumptions, misalignment, and misunderstanding run rampant and the blame-game can quickly spiral into a disaster.
- There’s no record of the conversation and no documentation. Without a written history of conversations, there’s no record of what was decided and what’s being saved for later. There’s just imperfect memories.
- Writing down ideas, either with a keyboard or with pen & paper, engages a different part of the brain than speaking, forcing us to confront the inevitable ambiguities and confusions of our ideas.
Remember, the goal is to bring your vision into the world, to make your product a reality. So we need to start by making the ideas as concrete as possible.
Many development firms skip this phase because they want to start cashing checks before a client realizes that their idea isn’t fully baked and they’re not ready to begin development. And many freelance developers just want to get in their comfort zone and start coding.
Even with all the great digital tools we have, I prefer to use pen and paper for this first step. It’s cheap, effective, and works every time – the only thing we really care about at the end of the day.
Refine Your Ideas
Getting all of your ideas out of your head and documented also give you the opportunity to kick your ideas around before you jump into development. You can come back to half-baked or incomplete ideas and improve them over time. You can also put the whole concept in front of users, customers, and vendors in order to get critical feedback before spending time and money on development.
This phase is easy if you simply take the time to answer the right questions. For years I used my custom 24” x 36” blueprints to guide my clients through the process in person. With this book, I’ve made a portable version of the blueprints to guide you through the process – either by yourself or with an experienced project manager.
2) Make a Precise Specification
In phase two, you’ll take your concrete ideas you’ve been kicking around and make them precise. You’ll deep dive into every scenario we can imagine. You’ll make sketches and diagrams until you’ve eliminated as much ambiguity as possible.
When the time to start development comes, you want the development team to focus on coding, not asking clarifying questions every 15 minutes – or worse, not asking for clarity at all.
The specification (or spec) is a tool to communicate with the entire team: designers, developers, project managers and even potential users. Each member can give you concrete feedback and improve your vision – assuring that everything is useful, user-friendly, and technically feasible.
3) Make the Specification as Technical as Possible
Finally, in phase 3, we make the spec as technical as possible – translating complex concepts into the language of developers and minimizing miscommunication between the project manager and the development team.
This not only helps you build the right development team for your project, but also gives the team a chance to ask questions and help you identify any technical issues that you may have missed so far.
The output is a set of technical requirements, mockups, user-flows, and a clear, detailed, precise, and technical product specification – exactly what designers and developers want and need in order to bring your vision into the world in the fastest and most cost-effective manner possible.
Developers love working with me because they know they’re going to get clear thoughtful spec that will allow them to focus on development and not worry about taking the blame for failed projects.
Let’s Talk Money
One of the first and most important questions most people have is: How much is this going to cost? So let’s cover that now. Obviously, it’s hard to estimate costs for a project without knowing the specifics, but there are a few minimums and rules of thumb.
As of 2019, it’s basically impossible to build an interesting mobile app for less than $8,000. Web apps – websites that are more than just simple blogs – start at around $4,000 and basic blog-based websites can be as inexpensive as $500 to get set up, depending on the technology you select.
After that, every few hundred dollars of additional investment gets you more features and a more polished and robust finished product. If a development shop is telling you that your project is going to cost $50-100k or more, then they don’t know what they’re doing, don’t know how to properly scope a project, or they think you’re a sucker who will overpay. The initial version of nearly every product – even very technical products – should be relatively inexpensive.
Recap
So far, we’ve covered why it’s so important to follow a process when building a product – especially if you have limited resources. We’ve also covered a proven 3 phase process for getting started:
- Get your ideas out of your head and refine them until you’re happy.
- Make a clear and precise product specification.
- Make the product specification as technical as possible.
The output is a set of technical documents that are essential to building the right team to successfully execute on your product the first time. The rest of this document covers the steps of each phase in more detail so that you can complete the accompanying blueprints at the end of this book and push your product across the finish line.
PART III: Process Walkthrough
A Step-By-Step Walkthrough of the Blueprints
Each of the steps that follow should be used to guide you through the blueprints at the end of this book. It’s okay to come back to sections and even jump around if you want. Make the process work for you.
If you need help or want to see additional examples at any point, head over to my site, check out the resources there, or schedule a time to talk with me.
An Example: The PlayDate Mobile App
To better illustrate some of the questions below, we’ll use a made up mobile app as an example. The PlayDate mobile app is a Tinder-style matchmaking service for children’s play dates. If you’re not familiar, Tinder is a popular mobile dating app where users set up a brief user profile and then view the profiles of nearby potential dates. They either “swipe right” to express interest in connecting with that person or “swipe left” to pass and see another potential match. If both users agree to connect, then the app opens up a chat between them.
In PlayDate, Parents will create one family profile for themselves and their children. Once they’re setup, each family will be able to look through the profiles of other families so they can find friendly, local, children, and parents. Like Tinder, if both families “swipe right,” then a chat will open between them and they can find a time and place to schedule a playdate for their kids.
Let’s jump into the first set of questions, keeping in mind our aim of phase one: to get ideas your ideas out of your head and onto paper.
The Basics
The first three questions you need to answer in order to create your product are:
- What is your vision?
- What key insights are driving you to create this product?
- What are the pain points or problems your users have?
Remember: It’s okay to do a first draft now, improve your ideas later, and even jump around a bit.
1. Vision
What future are you trying to bring into reality? What’s the vision for your product or organization?
The future you hope to bring about is the rock upon which everything else we do will be built. Your vision doesn’t need to be grandiose, bring about world peace, or require enormous personal sacrifice. But if you don’t have a relatively clear vision, then you don’t have something concrete at which to aim. If you can’t put together a one sentence draft of a vision, do not begin building your project.
For the PlayDate app our vision might be: “To build a company that helps build stronger families and communities by connecting parents with young children through in-person playdates.”
2. Key Insights
What do you know about your users, the market, or your product that others do not?
If a lot of other people had the same insights that you have, then this product would already exist. What do you know or believe that is unique?
For the PlayDate app our key insights might be:
- Young children need to be exposed to more people and environments than school or daycare can provide.
- Parents often yearn to meet other parents outside of their child’s school or daycare.
- The number of parents in urban areas with only one child is growing and so many children aren’t having the valuable experience of growing up with a sibling.
3. Pain Points
What pain points are you solving for your users?
Speaking figuratively, is your solution a pain killer or a vitamin? How big of a pain is it? What are your potential users already doing or trying in order to solve the problem?
For the PlayDate app, the pain points we’re addressing might be:
- Parents are often too busy to set up playdates, despite the benefits they bring to their family.
- Finding other parents who share their values is difficult but important.
- Parents can win back some of their scarce free time by letting children co-play or by having just one parent look after several children.
User Profile
The next three questions focus on who your users are, what jobs they’ll be able to accomplish with your product, and what assumptions and questions you may have about your users or technical elements of your product.
4. Target User
Who are your users? Be as specific as possible.
How old are they? Are they technical? What kind of job do they have? Do they have children? Live in the city? Own a house? Love jazz music? Are they politically active? How do they spend their free time?
For the PlayDate app, our target user might be busy, college educated, young parents who want their only child (ages 3 to 8) to grow up in a community of families that share their values.
5. Jobs
What jobs can the user accomplish?
Products and services help us accomplish a job. For example, TurboTax™ helps me prepare and file my state and federal taxes quickly and accurately so I can get back to spending my time on things I enjoy more than taxes. My AppleTV helps me find entertaining or educational content after work so that I can recharge for tomorrow. Instagram empowers millions of users to express themselves visually and helps them praise and share the content of others.
What job does your product help users get done? Great products usually make new jobs possible, help make existing jobs easier, faster, or cheaper, or simply bring more joy to their users’ lives.
The critical job for our PlayDate app is helping parents create a family profile and connect with other families in order to schedule playdates for their children.
Platforms
This is a good time to think through which platforms your application will initially support. Are you building a web page? a web app? a mobile app? for Android? Apple’s iOS? All of the above?
Pick platforms that are readily available to your users when want to accomplish their job but still have enough power to help them get the job done.
For PlayDate, we’ll want to launch initially with both iOS and Android apps. We’ll consider a desktop web-app if things go well with the mobile apps and enough users request a more robust web interface.
6. Assumptions & Questions
What assumptions are you making about your users? Technology?
This section can be a little tricky since you have to identify any assumptions you might be making about your users, their needs, their wants, and what solution they might want. This is also a great place to list any assumptions or questions you might have about the technical feasibility of your product.
For PlayDate, we’re assuming that parents will feel comfortable meeting other parents and letting their children play together. We also might have some questions about how difficult it might be to build a private chat that connects groups of parents.
Competitive Landscape
In this section, we’re going to focus on the business opportunity (if any), existing competitors, and why you think you’ll beat them long term. Not all of these questions apply to every product. Some products are just for fun or aren’t meant to generate a return. If a question isn’t applicable to your product, just move on.
7. Business Opportunity
How will you monetize? What is the size of the opportunity?
It took time – often years – for extremely successful organizations like Facebook, Pinterest, Xbox, and Nike to make money. The founders made an initial investment that paid off later. In this section you’ll think about how your product will fit into your organization’s broader business model.
Wikipedia, PBS, Khan Academy, and other organizations that don’t focus on profits still have business models – they’re just different. Your product doesn’t have to make money and it certainly doesn’t have to make money in the short term. But projects that don’t eventually generate sufficient revenue to cover their costs won’t be sustainable long term.
For our PlayDate app, maybe we decide that we’re going to show advertisements in the app that are relevant to parents of young children and offer in-app purchases for parents who don’t want to see ads anymore. Maybe we’re also considering a premium offering that uses a person to help create a custom match with another family quickly.
8. Competition
Who are your competitors? Who will love you if you’re successful? Hate you?
Thinking about other parties who may be affected by what your product does is a great way to better understand the entire ecosystem. It might also help you to plan how and when you want to announce what you’re working on to the world. Keep in mind that your biggest competition might be the status quo – what your user is currently doing to get the job done, even if it doesn’t work very well.
For our PlayDate app, we’d not only need to research existing competitors, but it’s also helpful to think about other forms of competition like the status quo (maybe handing kids an iPad or putting them in front of the TV), taking the kids to the neighborhood park, or enrolling them in additional hours of day care.
9. Competitive Advantage
What advantage do you have over the competition?
Your competitive advantage is what separates you from your competition – what resources you have that they don’t. Advantages can include nearly anything: money, experience, skills, connections, customers, suppliers, prices, costs, timing, or brand. List out every advantage you think you have over your competition and the status quo. Get creative!
For our PlayDate app, one example of a competitive advantage may be that a good friend of mine owns the local toy store and has an email list of over 9,000 local parents who could potentially be interested in PlayDate. You should try to have at least 2-3 clear advantages over your competition so that they can’t immediately copy you.
Guideposts
The next section will cover three guideposts – signals that will help keep us pointed in the right direction and on track throughout the rest of the process and during development. When things get confusing or tradeoffs must be made, return to your answers to these questions for guidance.
10. Hypotheses
What are you testing? What questions are you trying to get answers to?
No matter how much research you do before building a product, you’ll still have some questions that you’re not 100% sure how to answer. The early versions of your product should attempt to test the biggest areas of uncertainty directly so that you can get answers and adapt in future versions. It’s helpful to explicitly identify 1 to 3 hypotheses that you’ll test. If you get stuck, see if your answers from the Assumptions & Questions section earlier can be a good starting point.
The big question for the PlayDate app is whether parents will be interested in the service and whether our anticipated advertising revenue will cover costs or not. Maybe we’re also hypothesizing that we can one day sell other related services through the app, like babysitting, house cleaning, or tutoring.
11. Priorities
What are the 2-3 most important priorities?
Making your priorities clear is really helpful down the line when we’re dealing with difficult tradeoffs – two things we want that conflict with one another. If we decide, for example, that we want a website to be very feature rich, then we know that it might not be as user friendly as it would be if we had fewer bells and whistles. If our top priority is ease-of-use, then deciding whether to pack in more features or not is much easier. It’s helpful to put your 2 or 3 priorities in a numbered list.
For PlayDate, our top priority is that the app is simple and easy to use for busy parents. Maybe our second priority is that we focus on the quality of our families over the quantity. That might mean that we decide to build a clickable prototype before writing any code so that we can test the app with potential users and that we hand-pick the first 200 families that we invite to use the app.
12. Milestones
What are your milestones for the first 30, 60, and 90 days after launch?
The milestones section is fairly straightforward. Your vision paints a picture of where you’d like to eventually be and your milestones are the goals you need to accomplish along the way to realizing that vision. Be specific, quantitative, realistic, and have deadlines. Later on your milestones will help you know whether things are going well or not and encourage you to either try new things or keep marching down the same path.
For PlayDate, maybe we want to accomplish the following in the first 90 days:
- Facilitate 50 playdates.
- Earn ten 5-star reviews in the App Store.
- Perform three in-depth customer interviews in order to get feedback.
Go-To-Market
Understanding who a product is going to be marketed to is one of the most critical elements of building a product. The next two questions focus on your market – which may be different from who your user – and how you plan to reach them.
13. Market
Who is your market?
It’s easy to confuse a market with simple demographics. They’re not the same. “College educated women, 23-35 years old, with a young child and a full-time job” is not a market – it’s a set of demographics.
Geoff Moore’s Crossing the Chasm has the best definition of a market that I’ve ever found: A market is “a set of actual or potential customers for a given set of products or services who have a common set of needs or wants, and who reference each other when making a buying decision.”
It’s that last part (“who reference each other when making a buying decision”) that’s the most critical. Consumers are much more willing to buy or try products or services when they’re recommended by people they already know and trust. That trust transfers from the person to the recommendation. Think carefully about Moore’s definition as you determine which markets you’ll target.
For our PlayDate example, our market could be “College educated women, 23-35 years old, with a young child and a full-time job who attend the same women’s bible study group. Since these women see one another on a frequent basis and share the same faith, they’re much more likely to trust one another for product recommendations. Our initial marketing efforts will be much more likely to be successful by targeting a narrow group.
14. Go-To-Market Plan
How will you get your first 10/100/1,000/10,000 users?
A go-to-market plan lays out how you’ll get your initial users. There doesn’t have to be anything complex about it however you should be as specific as you can be and consider literally writing out the names of your first 10 users.
For PlayDate, maybe we’ll try a few routes initially and adjust once we’ve seen the results:
- We’ll ask our friends in the local men’s and women’s bible study groups if they’ll mention that we’re looking for families to beta test out our product.
- Since we have the help of the local toy store owner, we’ll announce a pre-registration signup during his next three monthly emails to his 9,000 patrons.
- We’ll also post physical flyers at his store and leave promotional cards at the register.
Features
Now that you’ve captured information about your vision, users, goals, competitive landscape, and markets, it’s time to shift our attention to the product’s features.
Bucket every feature you can think of into one of three groups:
- Dream Features
- Nice-to-Have Features
- Must-Have Features
Be as detailed as you can be and add as many features as you want – we can always move features from one bucket to another. If a feature feels large, it might be a feature set with several sub-features.
As you move through this section, think about whether you want to build just your Must-Have features – typically called a Minimum Viable Product (MVP) – or whether you want to build some of your Nice-to-Have features too. This typically depends on your budget, timeline, and what you’re hoping to learn with your first version. And of course, future versions will pull features from the Nice-To-Have and Dream lists.
15. Dream Features
Imagine the features your product will have a few years from now.
List each of the features you’d like to have one day but know you won’t build in the first few releases. It’s critical to get all of your ideas out and onto paper so don’t skip this step just because we won’t do anything with your answers right away.
An example Dream Feature for PlayDate might be to use machine learning to predict which families will be a great match based on their profiles and previous matching data. An example of a larger feature set would be to create white-label private ecosystems so that schools and daycares can help organize their parent’s playdates.
16. Nice-to-Have Features
What are the non-essential features you might want in this version?
List all of the features that would make your application better but aren’t absolutely required for the initial launch. This list will be the first place you’ll turn to once the Must-Have features are finished.
For our PlayDate app, Nice-to-Have features might include calculating a match-score for each set of families. Or maybe we’ll want to have in-app purchases for the ability to remove advertisements. That would mean that both displaying advertisements and the ability to remove ads with an in-app purchase would both be Nice-to-Have features.
17. Must-Have Features
What are the absolutely essential features in this version?
By essential, I mean that there would be no point in building this application at all without these features. Must-Have features are the core set of features that are required to make your application work. If removing a feature makes the whole product useless, then it’s a Must-Have feature. Everything other feature belongs in another column.
For our PlayDate app, Must-Have features include:
- The ability for a family to create a family profile (including names, ages, photos, etc for each family member)
- The ability for users to see the profiles of other nearby families and indicate whether they would be interested in meeting or not
- The ability for two families – once they’ve both selected to meet the other – to chat so that they can schedule a time and place for their first play date
Sketches & User-Flow Diagrams
Now it’s really time to get into the nitty-gritty! Over the next few steps we’ll break down your product into a flow diagram and a set of sketches to accompany every major element – which for software is usually a screen or page (I’ll refer to this concept as a screen from here on out). By drawing each screen a few times, you’ll get really clear on what things look like, where user interface elements live, and what the user can accomplish on each screen.
We’ll also differentiate between the experience that the user has during their first time using the product and subsequent uses. The first launch or use often includes on-boarding – explaining how things work to the user, guiding them through account creation, or helping them get acquainted with different features.
Sketching Tips
NOTE: Sometimes people get hung up on their drawing abilities. If you can draw a stickman, then you can do this. You don’t need a ruler, special paper, or any fancy tools. Just grab a pen or a pencil and start drawing. Your sketches are simply a visual way to communicate your ideas. They’re not supposed to be perfect or artistic.
If you’re struggling, here are some tips that might help:
- Grab a blank sheet of printer paper and fold it in half. Draw a rectangular box on each side, representing 2 screens. This works for both mobile apps, desktop apps, and websites – just turn the paper if the screen is landscape versus portrait. You can print out additional blueprint pages here.
- Start with a marker or sharpie instead of a fine point pen or pencil. This will let you focus on the big picture now and the finer details later. Don’t worry about colors or imagery. Focus on the elements that the user can interact with. What can the user see, click on, touch, etc?
- If you’re really struggling to put pen to paper or feeling intimidated, use a napkin, envelope, or post-it note instead of a clean blank sheet of paper. Or crumple up your paper a bit, un-crumple it, and then start drawing. Do not let perfectionism hold you back from moving forward and know that your sketches will get better as you repeat them.
If you need some 1-on-1 help with any of the next steps, want to see the full-color images, or need additional blueprints you can print out, head over to my site.
18. Rough Sketches: Typical Launch
Quickly sketch what a typical launch will look like. Focus on the big picture, not the details.
We’ll get more detailed in future sketches but for now just sketch the basic elements of your product. Draw each of the major screens, the major features on each screen, and use arrows to show how the user will navigate between them.
A trick I learned while I was studying at the Stanford d.school (Design School) for my masters is to use a fat marker so that you simply can’t get bogged down with the details. Another way to mimic this effect is to use a regular pen or pencil but to draw everything in miniature. Watch out though: using a marker with this book will cause bleeding so consider using scratch paper.
So for the PlayDate app, maybe we’ll have 5 key screens that would look something like this:
It’s worth noting that by sketching these screens I uncovered the fact that there are two screens related to profiles – the Family Profile Screen. Each user has a profile that they can view and edit. But they also have the ability to view other family’s profiles. While those two screens are similar and much of the code will be shared between them, they aren’t identical. Catching things like this early will save time and money later.
19. Rough Sketches: First Launch & On-boarding
Quickly sketch what the first launch experience will look like. Focus on the big picture.
On-boarding is the process users go through in order to get up and running with a product. Generally speaking, if you have a lot of on-boarding, then your application is either extremely complex (like a commercial airplane cockpit) or poorly designed.
Think about Google search. When you go to Google.com there are only 4 things in the center of the screen: Google’s logo or the daily doodle, a search field, and 2 buttons: Google Search & I’m Feeling Lucky.
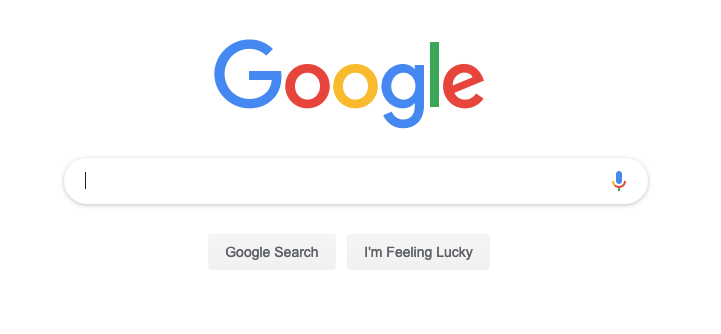
For Google search, there is no on-boarding because everything is self-evident. Millions of users performing billions of searches a day and no one needs any instructions. That’s a great product.
While your product may be novel enough that users need some on-boarding, if you have too much, then your idea isn’t simple enough and users will struggle to use it and share it with others.
For our PlayDate app, we’ll want to keep the on-boarding simple. Maybe we’ll show them a 15 second animated video or show them a few quick static screens that describe how the process of matching with another family works. Then we’ll want to take them directly to their profile screen so they can fill in their information and start getting matches as quickly as possible.
20. Rough Sketches: Screens & Notes
Quickly sketch all the screens of your application. Focus on the big picture.
The first step is to identify all of your screens – whether they’re pages of a website, different parts of a mobile app, or anything else. Once you’ve done that, roughly sketch each screen. Draw only the key User Interface (UI) elements – especially ones that perform special actions or navigate the user to another screen. Finally, give each screen a name.
For the PlayDate mobile app our core screens would be:
- Family Profile Screen (to view and edit my family’s profile)
- Swipe Yes/No Screen
- Family Detail Screen (to view other family’s profiles)
- Inbox Screen (to process matches)
- Chat Screen
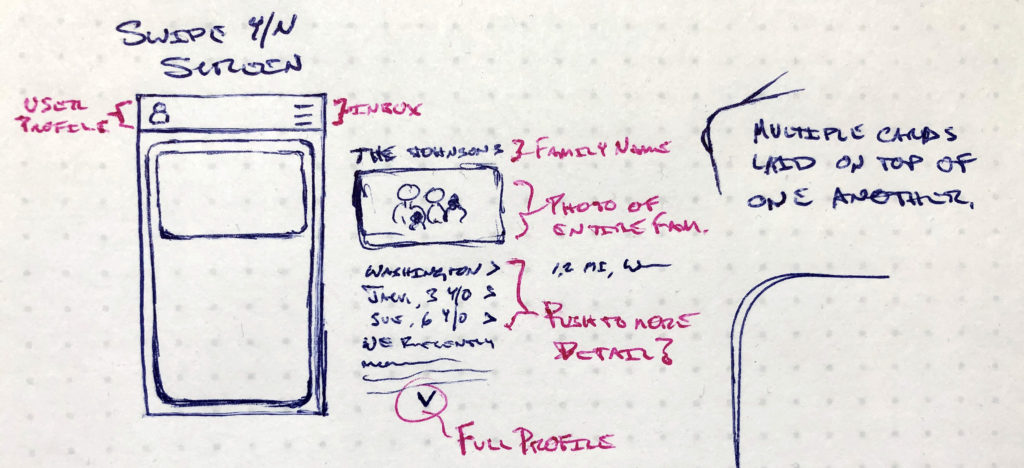
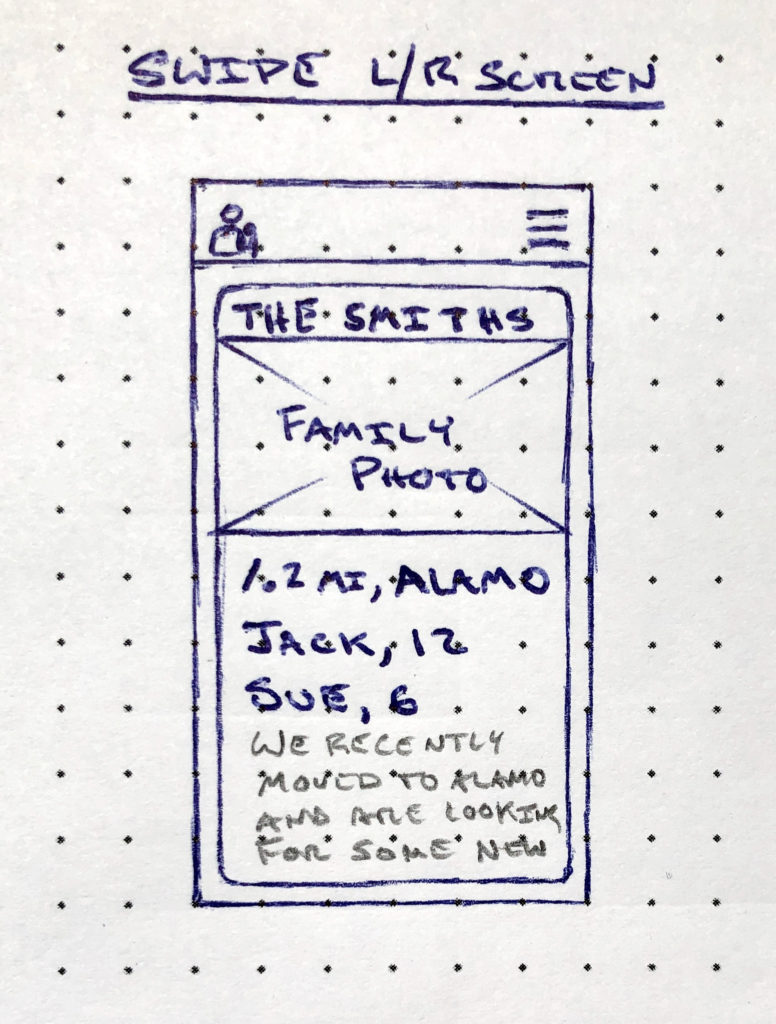
There may be other minor screens, but these are the most important ones. Take care to identify all of your application’s screens. I’ve sketched the Swipe Yes/No Screen below.
21. Draft User-Flow Diagram
Quickly sketch how the user will get from screen to screen. Add notes.
Now that you’ve identified and sketched each screen at a high level, let’s think through how they all fit together in more detail. This “User-Flow Diagram” is essential for understanding the app’s architecture later. Start by drawing a box representing the screen that users will see first when they launch your app or website? Which screen is the homebase for the user? Label that box with the name of that screen.
From there, draw boxes for every screen that the user can reach from that homebase screen. Connect those screens with lines to represent how the user will navigate from screen to screen. Add arrows to the lines to show which direction the user can go (forward and back). Repeat these steps for each of the screens you identified earlier. Every screen should be connected by some pathway and there should be no “orphaned” screens.
For the PlayDate app, the home screen is the tinder-style feed of other families which might make for good play dates (what I called the “Swipe Yes/No Screen” above). When you launch the app, the user is most likely looking for another family with which to match.
But they need to be able to quickly view more information about the potential match in front of them, get to, and update their own profile, and to get to their new and existing chats with other families.
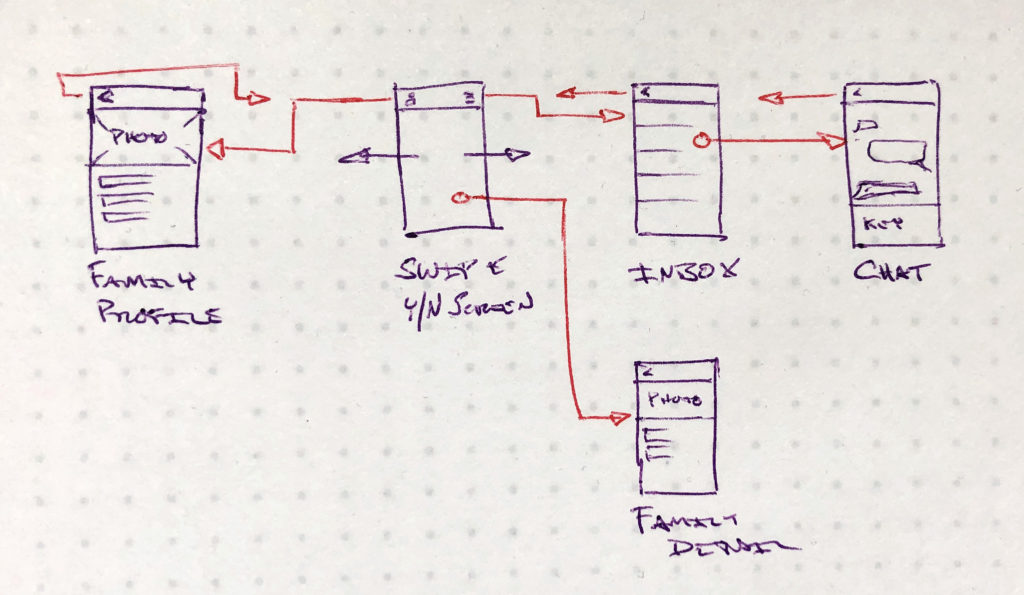
So our flow diagram probably looks something like this for our 5 core screens:
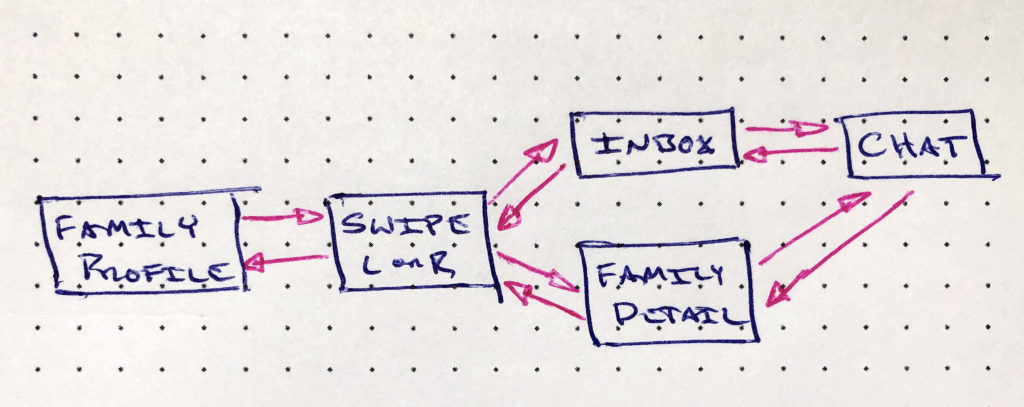
Again, the PlayDate app likely has other screens that aren’t captured here. Repeat this entire process of creating a flow diagram for the on-boarding experience as well.
Refine, update, and redraw your screens and user-flows until you’re ready to draw the final set in the next two steps. If you’re struggling with any of these steps, don’t worry. Just do your best and schedule a time to chat with me at my website.
22. Final Sketches: Screens & Notes
Sketch each screen. Be as detailed as possible. Include detailed notes.
Redraw each screen in as much detail as you can and make any clarifying notes. For each screen make a “User-Can List” – a set of sentences that begin with either “User can” that explain exactly what the user can do on each screen. Sometimes the user doesn’t initiate an action and so you may need a few “App can” or “App will” sentences as well.
As you go through this set of drawings, identify any graphics that you’ll need to have designed, including logos, app tiles, launch screens, custom buttons, backgrounds, and any animations you might want.
To the right is a higher-resolution version of the Swipe Screen for the PlayDate app.
23. Final User-Flow Diagram
Sketch the final user-flow diagram, linking together each of the screens. Include detailed notes as necessary.
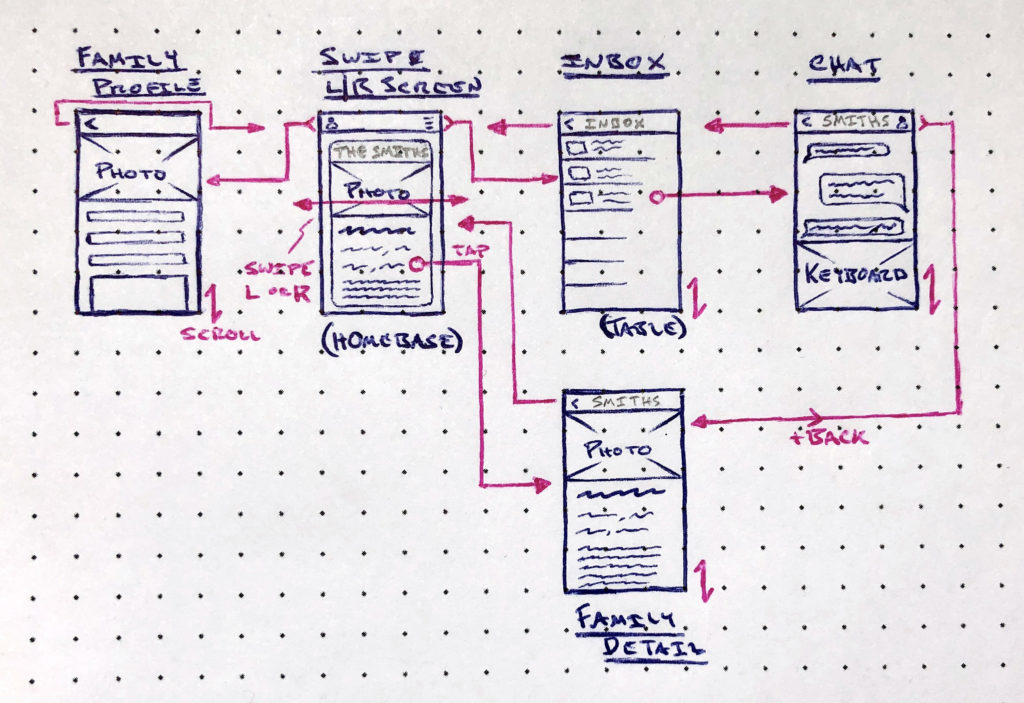
Create the final user-flow diagram The final user-flow brings everything together and serves as the starting point for your development team. Remember to show every way users will arrive at or leave a screen. Include any additional notes that you can – anything from transitions to how you think data may move around.
Your diagram can simply be an improved version of the draft user-flow diagram from above. However, in my sketches I combined the screen sketches with the user flow diagram. Either way, the goal remains the same – to clearly communicate the details of your application to your development team.
Review
Review everything above, making things more and more precise each time. Pretend that the only thing you’ll hand over to the development team are these final sketches, user-flows, notes, and user-can statements and ask yourself whether the team would have any questions. Make notes to answer any unaddressed questions.
Next Steps
Now that you have a final set of clear, precise specification (the features list, sketches, user-flows, notes, and user-can statements), you’re ready to hire a project manager. A good project manager has built and shipped many products and can quickly bring together the right team for your project.
A great project manager should do the following:
- Review the entire project.
- Provide feedback.
- Assess technical feasibility and risk areas.
- Assist with scoping.
- Help you make the spec more technical.
- Identify back-end needs.
- Estimate budgets.
- Identify all of the skill sets needed.
- Find, interview, and hire any required graphic design talent.
- Find, interview, and hire any required development talent.
- Set up code repositories.
- Research and identify possible open-source code.
- Manage the team.
- Launch the product or submit for any required review.
Finally, a good PM will effectively manage a team to build a high-quality product on-time and on-budget. If you’re looking to hire the right PM for you and your project – or if you want to hire me – reach out at my website.
After hiring a PM, it’s time to kick off your project and begin development. Once you’re sure your spec is right and you are ready to begin development, it’s key to finish the first version quickly. Letting a project drag out has two major drawbacks.
The first is that if you’re intentionally restricting the pace of development, then you’ll be much more likely to make changes and tinker with the spec. Aside from not following a process at all, the next biggest waste of money during is making unnecessary changes to the spec during development.
The second drawback of not developing as quickly as possible is that the development team’s attention will likely be divided between your project and others, introducing unnecessary switching costs and diluting their focus on your project.
PART IV: The Blueprints
(As of May 28, 2019, these blueprints are still being laid out in Adobe InDesign. I’ll include them here when they’re finished.)
About Andrew Bellay
It seems pretentious to write this in the third person so I’m not going to write it like a real human being. I grew up around computers and technology so it’s no surprise that I became an engineer and love solving problems. When I started my first company in 2010 I taught myself to code because I couldn’t afford to hire the development talent I needed. Since then I founded 2 more companies, and have worked with hundreds of entrepreneurs, innovators, designers, and developers to build and ship dozens of products. I’ve consulted with Stanford University, Corning Glass, The Sacramento Kings NBA team, LinkedIn, Google, UCSF, and many early stage start-ups. I’ve earned a Bachelors of Science in Chemical Engineering, a Bachelors of Arts in Liberal Arts from UT Austin, and a Masters of Science in Management Science & Engineering from Stanford University.